
Monday, January 23, 2012
Necklace Scarves
I fell in love with Necklace Scarves. I made a couple will post one of the pictures now and more later.

Thursday, January 19, 2012
Owl Hats
I have only boys in my family but have been dying to make girly hats, luckily my friend has two adorable toddlers. So I made these for them...


I actually used two patterns for these, and combined them for my own.
Tuesday, January 10, 2012
Sleeping Hat Progress...
Well I actually don't have 'progress' to report seeing as I finished in under 3 hours. :) Not expected. Just trying to do it, with no pattern, I'm fairly proud of my finished product. Though I don't love it and will refine before making for other people. Below is my finished hat. As soon as I refine I'll post the pattern here.


My lil Raiden, aka RC, modelling his newest hat, unwillingly.

My Modern Flower Hats
As promised here are the pictures of the two hats I made. Simple, easy, fast, fun. Just my kind of craft project.

This hat above was made for Tabitha, a little longer then Shannons which is below. Other then color and button that was the only change made between the two.

The hat pattern was found here. And flower pattern was here.
Monday, January 9, 2012
Oh My Hats....
My latest crafting adventure has been HATS. I just finished hats for my two dearest friends, and now I'm working on one for my son, Raiden, simply as a practice for a kind I've never tried. I got a request for a old fashioned stocking cap, aka sleep cap. I've always wanted to try one, so here goes my newest adventure.... Pictures and progress to come. Will post pictures and pattern links for my last two hats.
Sunday, January 1, 2012
Salt Dough Ornaments
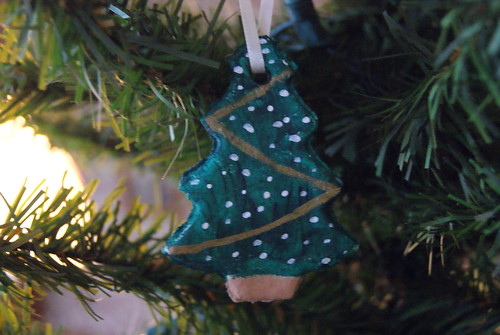
2011 found me crafting more Christmas gifts then ever. One of my favorites was these Salt Dough Ornaments. They were so simple and fun.
Recipe:
1 cup salt
2 cups flour
1 cup luke warm water
Simply mix the salt and flour together, then add the luke warm water until it gets a doughy consistency. Then knead with your hands for at least 5 minutes, the longer you knead the smoother the dough will be.
Roll out and cut with your favorite cookie cutters. You can roll it out at thin or as thick as you'd like but keep in mind the thicker you make them the longer it will take to dry. Then put them on your cookie sheet and grab a straw to make your holes.
We tried air drying, and using the oven. The oven at around 200 degrees till dry gave us the best results. Anywhere from 25 minutes -2hrs depending on the thickness of your ornaments.
When done you can leave them or paint. We painted them with acrylics added cream colored ribbon as a holder and wrapped them up.
Subscribe to:
Posts (Atom)